Option Sets
The Option Sets page is where the answers for Select One and Select Multiple question types can be created. Click Option Sets on the menu bar to create or edit existing Option Sets.
Create new option set
Click Option Sets menu.
Click Create New Option Set.
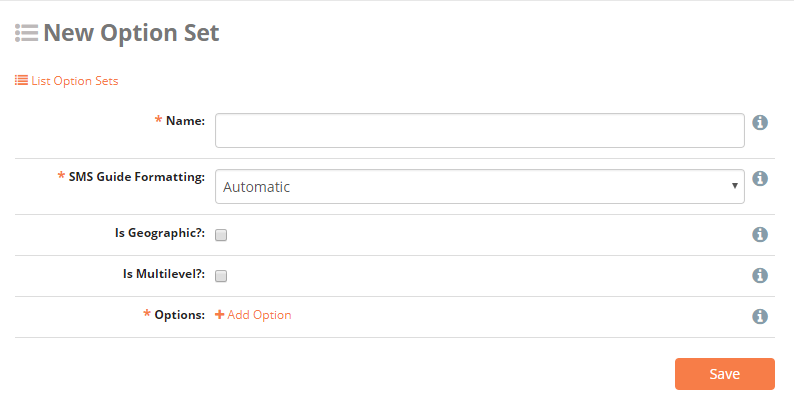
Name A unique name for the Option Set.
Is Geographic? Example, a set of provinces or regions. Responses that are geographic will appear on the map in the Dashboard. When checked, a new checkbox With Coordinates? is shown. If the options contain coordinates, check this box.
Is Multilevel? Check this box if you have Multilevel options sets.
Options Click Add Option to add a new option.
For each option added, you can add a value and relevant translations. To access or perform calculations with the option values, please see the sections on Default answer and XPath expressions.
Multilevel options sets
Checking Is Multilevel? box allows the use of hierarchically organized options. Multilevel option sets can only be used for Select One questions. Below is a classic example of countries and cities. Level 1 is Country and level 2 is City. The level 2 options needs to be indented compared to level 1 options. Drag and drop options to achieve the desired result.

Edit existing option set
Click Option Sets menu.
Select the Option Set to edit by clicking .
Click Save.
Import standard option set
Click Import Standard Option Sets.
Check the boxes next to the option sets to be imported.
Click Import.
Import new option set
Option Sets can be created with spreadsheet software like Excel, and uploaded directly into NEMO. You can import single level option sets with translations and multi-level option sets. Please note that multi-level option sets with translations are not supported.
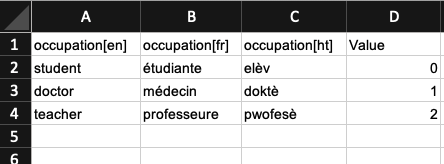
Option sets with translations
Outside of NEMO, create a CSV or XLS file.
In the first row, for each language you would like, put a language code in brackets for each column header and an optional Value column header.
Example: occupation[en]|occupation[fr]|occupation[ht]|Value
Add the translations of the options.
In NEMO, click Option Set menu.
Click Import New Option Set.
Choose a name for the option set.
Choose the CSV file created in steps 1-3.
Click Import.
Note
If you are importing values, the Value column header must be capitalized.
Note that the name (in the example, occupation) next to the language in brackets is optional.
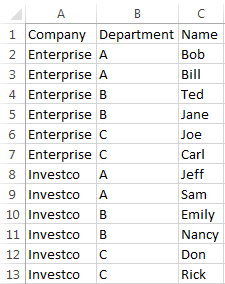
Multi-level option sets
Outside of NEMO, create a CSV or XLS file.
In the first row, include the name for each level as an individual column header (example Company | Department | Name ).
Add the names of the options.
In NEMO, click Option Set menu.
Click Import New Option Set.
Choose a name for the option set.
Choose the CSV file created in steps 1-3.
Click Import.
Note
For large files, import can take some time. To see the status of the import go to operations panel by clicking on the link in the blue notice or going to https://yournemoinstance/en/operations .
Import option set with coordinates
To upload an option set with coordinates:
Outside of NEMO/ELMO, create a CSV file (you can export from XLS to CSV from any standard spreadsheet software).
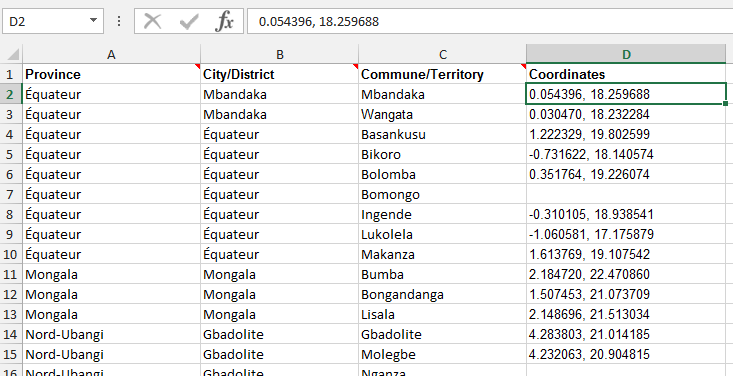
In the first row, include the name for each level as an individual column header with Coordinates as the last column (example: Province | City | District | Coordinates ).
Add the names of the options.
In the column for Coordinates, include both latitude and longitude in decimal format separated by a comma (example 0.054396, 18.259688).
In the mission you are working on, click on the Option Set menu.
Click Import New Option Set.
Choose a Name for your option set.
Choose the CSV file you created.
Click Import.
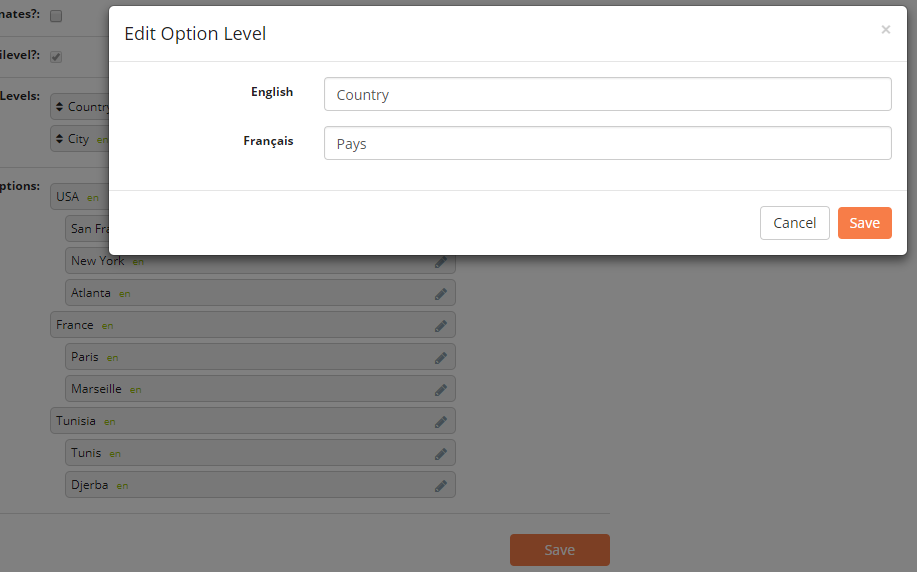
Language translations
Options within an Option Set can be translated in a manner similar to translating questions. To translate an option:
Create or edit an existing option set.
Click next to the option to be translated.
Type the translation.
Click Save.
Note
The two-letter language code for every translation appears next to the option name.