User Management
User permission levels
NEMO has four user levels – Enumerator, Staffer, Coordinator, and Admin. Each user level has a different set of permissions based on the functions they are expected to perform during the missions.
Role |
Responsibility |
Privileges |
|---|---|---|
Enumerator |
Collects and submits data from the field. |
|
Reviewer |
Review collected data and performs real-time analysis. |
|
Staffer |
Communicates with staff deployed to the field. |
|
Coordinator |
Designs forms/checklists, reporting structures, and manages users for a specific mission. |
|
Administrator |
Designs standardized forms/checklists and manages processes accross several missions. |
|
Create users
Create, delete, edit, and manage users on the users page. Administrators can create general users in Admin Mode and assign them to specific missions, or they can create users for specific missions in Mission Mode. Coordinators can only create new users in Mission Mode.
To create new users:
Determine whether to work in Admin Mode or Mission Mode.
Navigate to the users page by clicking Users on the main menu.
Click Create User.
Enter the new user’s information.
Click Save.
Import users
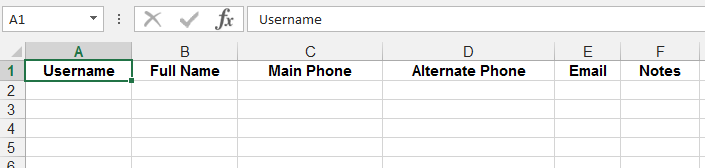
You can import multiple users from a CSV file (you can export from XLS to CSV from any standard spreadsheet software).
From the Users page, click Import Users.
Click one of the links to download a template CSV file.
Assemble your user data in the template.
In your browser, select the spreadsheet file to upload.
Click Import.
Note
Available columns are: Username, Full Name, Main Phone, Alternate Phone, Email, Birth Year, Gender, Nationality, Notes, and Groups. Only the Username and the Full Name are required, the other columns are optional.
Manage existing users
To edit existing user information:
Find the user in the list of users.
Click located on the same line.
To delete existing users:
To delete a single user, click .
To delete multiple users, check the boxes to the left of their names and click Delete Multiple Users.
Export in vCard format
To export users information to a vCard, which is readable by most contact list applications:
Check the box next to the name of each user to be exported.
Click Export as vCard.
User groups
Placing users into groups makes it easier to search for users and send broadcasts to them. To add a user to a group:
Click Users menu.
Click to edit a user.
In Groups input, select an existing group from the list or type the name of a new one then click Enter.

Click Save when finished editing.
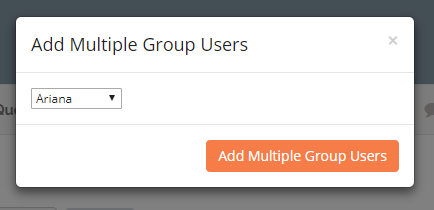
To add multiple users to an existing group:
Click Users menu.
Check the box next to the users you want to add.
Click Add Multiple Group Users.
Select the group then click Add Multiple Group Users.